Baking

Vegan and Sugarfree Layered Blueberry 'Cheesecake'

15:15:00 theskyisstarless 1 Comments

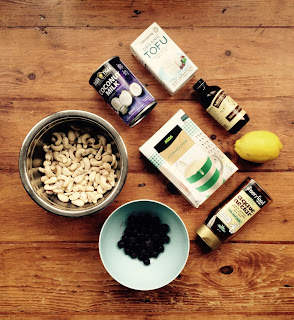
I'm always experimenting with vegan and especially sugar-free baking- blogs such as Deliciously Ella and My New Roots are my main inspiration. I had a pack of silken tofu which needed using up so I created this recipe for a layered blueberry 'cheesecake' topped with a blueberry and chia seed jam. The silken tofu gives it texture but the coconut milk and frozen blueberries gives it its delicious flavour.


Soak 1 1/2 cups raw cashews in water overnight. 


Blueberry and Chia Seed Jam
  • 3 cups of blueberries- I used frozen.
  • 3-4 tbsp maple syrup
  • 2 tbsp chia seeds
  • 1/2 tsp vanilla extract
  1. Bring blueberries and maple syrup to the boil, stirring frequently. Reduce heat and simmer for around 5 minutes. Mash the blueberries slightly. You want some texture so leave some whole.
  2. Stir in chia seeds and continue simmering until it thickens and becomes jam-like.
  3. Remove from heat and stir in the vanilla extract.


To make the base:
  • 1/2 cup raw almonds
  • 2 cups oats
  • 1/2 tsp cinnamon
  • 1/4 tsp sea salt
  • 1/4 cup coconut oil
  • 2 tablespoons maple syrup
  • approx 1 1/2 tablespoons of water
  1. Preheat the oven to 200 C. Grease an 8-10 inch tart or cake tin. I used a push-pan. Cut a circle of greaseproof paper to line the base of your tin.
  2. Process the almonds in a food processor until they resemble crumbs. Add oats, cinnamon and salt and process again until it resembles coarse sand. Add oil, maple syrup and water and process once more until you get a dough.
  3. Press into the base of your pan. Bake in oven for around 15 minutes until turning golden-brown. Leave to cool.

To make the topping:
  • The soaked cashews, drained.
  • 1 cup silken tofu
  • 1/2 cup coconut milk
  • 1/3 cup agave nectar/ maple syrup
  • 1 tbsp lemon juice
  • 1 tbsp cornflour
  • 1 tsp vanilla extract
  • 1 cup fresh/frozen blueberries
  1. Turn down the oven to 175 C
  2. Blitz the cashews until you get a thick paste. Add the remaining ingredients apart from the blueberries and process again until smooth- don't worry if it seems quite grainy at this point.
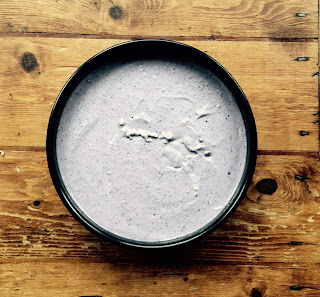
  3. Pour half of this mixture on top of the base. Then process the remaining mixture with the blueberries- adding a few more blueberries if you want a darker colour. Pour this lilac mixture on top of the white mixture. Bake for around 40 mins until you get a slight wobble but an inserted skewer remains clean. Leave to cool. I put mine in the fridge for about an hour.

Top the cheesecake with the blueberry and chia seed jam and leave to set. Top with fresh blueberries before serving and enjoy.


1 Comments:

Sewing

Refashion: Men's Shirt into Skirt

15:25:00 theskyisstarless 0 Comments

I love refashioning things- I've made dresses from scarves, cardigans from jumpers and skirts from dresses. I kept seeing all these men's shirt refashions on Pinterest and when my mum gave me a stack of my dad's old shirts I knew that I had to try one. I refashioned this shirt into a skirt.


I chose this GAP gingham shirt with strange green stains on it. I knew that I wanted to make a skirt which still resembled a shirt. I started by chopping off the sleeves and the back yoke.


The pocket was in the wrong place to incorporate it into the design so I unpicked it.


I then cut along from the bottom of the sleeves all the way around.


I measured around my waist and then cut a waistline from the top scrap material. I kept the shirt buttoned up and then cut so that a button would be centred on my waistband. I ended up with two waistband pieces of length waist measurement plus 1 inch and width of two inches. 


From the sleeves I cut two equally sized pieces. I also cut two pieces of fusible interfacing. I attached the two outer pieces right sides together along with the lining and sewed along the edges with 1/2 inch seam allowance to create a long strip. I did the same with the pieces cut from the sleeves and then pinned the two strips together and sewed along the edge leaving the ends open.


I then turned this strip inside out and pressed along the edges well. The openings were then slip-stitched closed. I edge stitched along the edge of the waistband.


I folded and pinned some pleats in the main body of the skirt so that it was the same length as the waistband. I then sewed along the top to secure the pleats. I pinned the waistband and the skirt right sides together and sewed along the top. 


I slip stitched the seam down, pressed and cut off any loose threads.


I'm really happy with how this skirt turned out. I wear it with a black crop-top, ankle-boots, and my faux-leather jacket.  I hope this has inspired you to refashion some of your old clothes and give them new life.

Love Rhiannon x

0 Comments:

Baking

Summer Pimms Cake

18:15:00 theskyisstarless 0 Comments

I've been a bit late in publishing this blog post because I've been on holiday and now summer feels like it has ended. It is a really light and refreshing cake, perfect for eating at a summer barbecue with a glass of Pimms.


 All the wet fruit and jam I added made the frosting rather runny so I wouldn't advise making this as a 'showstopper' cake unless you don't add the fruit.

When I was making this cake I started off making two layers but then they came out so thin that I had to make a third layer which is why in my picture below there are only 2 eggs .

To make the cake you will need:

  • 180g of softened butter
  • 180g caster sugar
  • 3 eggs
  • 270g of flour
  • 4 tsp of lemon rind
  • 45 ml of Pimms


Start by greasing and lining three cake tins. Preheat the oven to 180 C. Then, by hand or using an electric mixer, beat the butter and sugar together until fluffy.


Then add the eggs one by one, mixing well after each addition. Add a tablespoon of flour with the final egg to prevent curdling. Add the lemon zest and beat well.


Add a quarter of the Pimms followed by a quarter of the flour. Fold in. Keep folding in the Pimms and flour gradually like this until everything is well combined. Divide between the three tins and bake for 20 minutes or until golden brown and an inserted skewer remains clean. Set aside to cool.


To make the frosting you will need:

  • A handful of fresh mint leaves. I picked mine from my garden.
  • Approximately a 2 inch long piece of cucumber.
  • 120g butter
  • 240g icing sugar
  • 30 ml Pimms
  • A couple of tablespoons of strawberry jam


Start by blitzing the mint and cucumber in a food processor, add the Pimms. You want chunks of cucumber in order to get the flavour. Beat the icing sugar and butter together until smooth. Add the cucumber, mint and Pimms and beat until fully combined. Add more Pimms, cucumber, mint to taste.


Assemble the cake by sandwiching jam and buttercream between the cakes. Top with more buttercream and fresh fruit and mint. Enjoy!


Love Rhiannon x

0 Comments:

DIY

Tutorial: Decoupage Comic-Book Table

18:13:00 theskyisstarless 0 Comments

We've recently been refurbishing our basement and found this old school-style table. My mum had watched a video where a girl had decoupaged the top of the table and recruited me, as I'm in a post-alevel and pre-uni limbo with nothing to do, to paint and cover the table.


I dragged the table outside and noticed that the layer of varnished wood on the top was able to peel off. I pulled this off and was left with the perfect surface to decoupage, even and slightly rough.


I then used a surface primer to prime the legs and side of the table. The primer is extremely important, especially if painting on top of existing paint work or onto metal. I used a spray-able primer. 

I then left this to dry for 24 hours before painting the table. I chose a bright red, again in a spray-able form. I covered the legs and sides with paint and again left to dry.

While the table was drying I began cutting up some of my brother's old comics. You could use newspaper, wrapping paper, specialist decoupage paper etc. I used a variety of different colours and cut them into different sizes. 

Once the table had dried, I brought it back inside and taped around the sides with masking-tape to make it neater. I then began sticking the paper to the table using mod-podge. I used a wallpaper roller to get rid of air bubbles.

Once I had completely covered the table I used a sealant to protect the table and to keep everything glued down. 


Here is the completed table. It was so easy to do- waiting for a sunny day to do the painting was the hardest part!!

It is such a unique and interesting piece of furniture which I hope you will enjoy making.

Love Rhiannon x

0 Comments:

Cooking

Adventures in Vegan Cooking

16:59:00 theskyisstarless 0 Comments

I have been a vegetarian my whole life but I have recently been toying with the idea of becoming vegan. I'm interested in living a cleaner and healthier lifestyle- I don't think I'm ready to convert to a full plant-based, gluten free diet but I am trying to make small changes and experiment with vegan substitutions. Using a mixture of recipes from well-known bloggers such as Deliciously Ella, Madeleine Shaw, and My New Roots- I created a three course vegan meal for my family.

I made a fresh and summery lentil, courgette and mint salad using a recipe from Deliciously Ella's Book. The full recipe can be found here. I found the colours of the ingredients looked so beautiful together that I instagrammed this picture and Ella herself liked it.


It is such a light and flavoursome salad. The lime juice and fresh mint, picked from my garden, worked so well together. Avacado in anything catches my interest and with the thinly sliced courgette it tasted heavenly.


Alongside this salad we had sweet potato cakes (Deliciously Ella again) with a fresh rocket salad. Sweet potatoes are a staple in our family, we seem to have them with every meal. 


These were super simple to make. You essentially make sweet potato mash, add spices, shape and bake.


There were so soft and tasted brilliant with both the rocket and courgette salad. We needed the courgette salad to take away some of the spice, I think I added too many chilli flakes.

For my main course I made Deliciously Ella's Mushroom and Chickpea Stew. It is such a simple stew but this allows for a deeper flavour in the sauce. It is such a versatile stew, you could add anything to it. 


There is so much stew left over that we will be eating it for days. I'm thinking crusty bread or perhaps some herb dumplings.


To accompany the stew I found a recipe for cardamom spiced cauliflower rice on Madeleine Shaw's blog. When you're a vegetarian most meals consist of some carbohydrate such as rice or pasta with curry or chilli or some kind of sauce. It was therefore refreshing to have an entire main course consisting of just vegetables and pulses. 


I simply blitzed a whole cauliflower in the food processor, melted some coconut oil with some cardamom pods in a frying pan, and fried the 'rice' for around 3 minutes, adding some more spices mixed with a small amount of water.


It is so much quicker to make than normal rice and tasted great. A brilliant way to get more vegetables into my diet.

My favourite part of any meal: dessert. I wanted to make a refined sugar-free and vegan dessert but was slightly worried that it would end up tasting like cardboard. Most vegan desserts I've found use really expensive ingredients but I found this recipe for Banoffee Pie from New Roots which mostly included ingredients which we already had. The base is made by blitzing all the ingredients in a food processor, pressing the mixture into a tin and baking for around 10 minutes.


For the toffee I started off by making my own almond butter by roasting almonds for 10 minutes and then blitzing them in a food processor with a pinch of salt until it reaches a smooth 'gloopy' consistency.


The toffee was then made by softening the dates by pouring hot water over them and then blitzing until smooth. When I usually make toffee using sugar I normally end up burning it but this was so straightforward. It also tasted amazing, I couldn't stop myself from having a little taste.


The cream substitute is simply whipped coconut milk. Although the smell resembles cat-food it gives a tropical taste to the tart.


After assembling the tart I topped it with more banana and dusted some vegan chocolate over the top.


The whole family loved it, there were so many 'best ever' s. It wasn't as sickly sweet as most Banoffee pies are and I couldn't quite believe that it was sugar-free and vegan. 

I will definitely be making cauliflower rice and vegan Banoffee Pie again in the future and I look forward to introducing new vegan alternatives to my diet and potentially becoming vegan in the future.

Love Rhiannon x 


0 Comments: